Sourdough Starter & Bread Recipe

IMG_6865.jpg

You know what I hate? When a blogger writes a recipe and they tell you their life story and you are just like GIVE ME THE DANG RECIPE!!! So, I will refrain from doing that and get to it!

Recently, on the Real Peel Instagram, I showed myself making a sourdough starter and then the sourdough bread and I had a major influx of requests for the recipe. So, without further ado…

disclaimer: I am not a pro photographer or care to be, but I took the pics so you guys can see if you are on the right track while baking.

IMG_6856.jpg

Making Your Starter

note the bubbles

  • 2 cups warm water (not hot or boiling)

  • 1 teaspoon active dry yeast

  • 2 cups all-purpose flour (I don’t know how it would work with gluten-free, but if you try it, let me know)

In a bowl, add the warm water and yeast. Mix until the yeast is dissolved. Once dissolved, mix in the flour and stir until smooth.

Pour the starter into a plastic container that is big enough to allow for expansion. I, personally, used a plastic pitcher. Place a cloth napkin over the container and hold it in place with a rubber band.

Set the starter in a spot that doesn’t get too cold or too warm, doesn’t have a lot of draft and not a ton of sunlight for 5 days. Stir the starter once a day.

After the 5 days, it is ready to be used or put into the fridge for storing. If you keep it in the fridge, you only have to feed it 1 time per week with equal amounts of flour and water.

Making the Sourdough Bread

this recipe is adapted from Cultured Food Life

You will need:

  • 1/4 cup of your starter

  • 1 1/3 cups plus 2 tbsp of warm water (again not boiling, just warm)

  • 4 cups plus 2 tablespoons of all-purpose flour (I personally haven’t tried other flours)

  • 1 1/2 teaspoons of sea salt

  • a Dutch Oven

  • Parchment paper

  • Whisk

  • Spatula

Tip: it’s so much easier to gather all ingredients before you start mixing.

  1. Add the starter and warm water to a ceramic bowl. Whisk until well combined

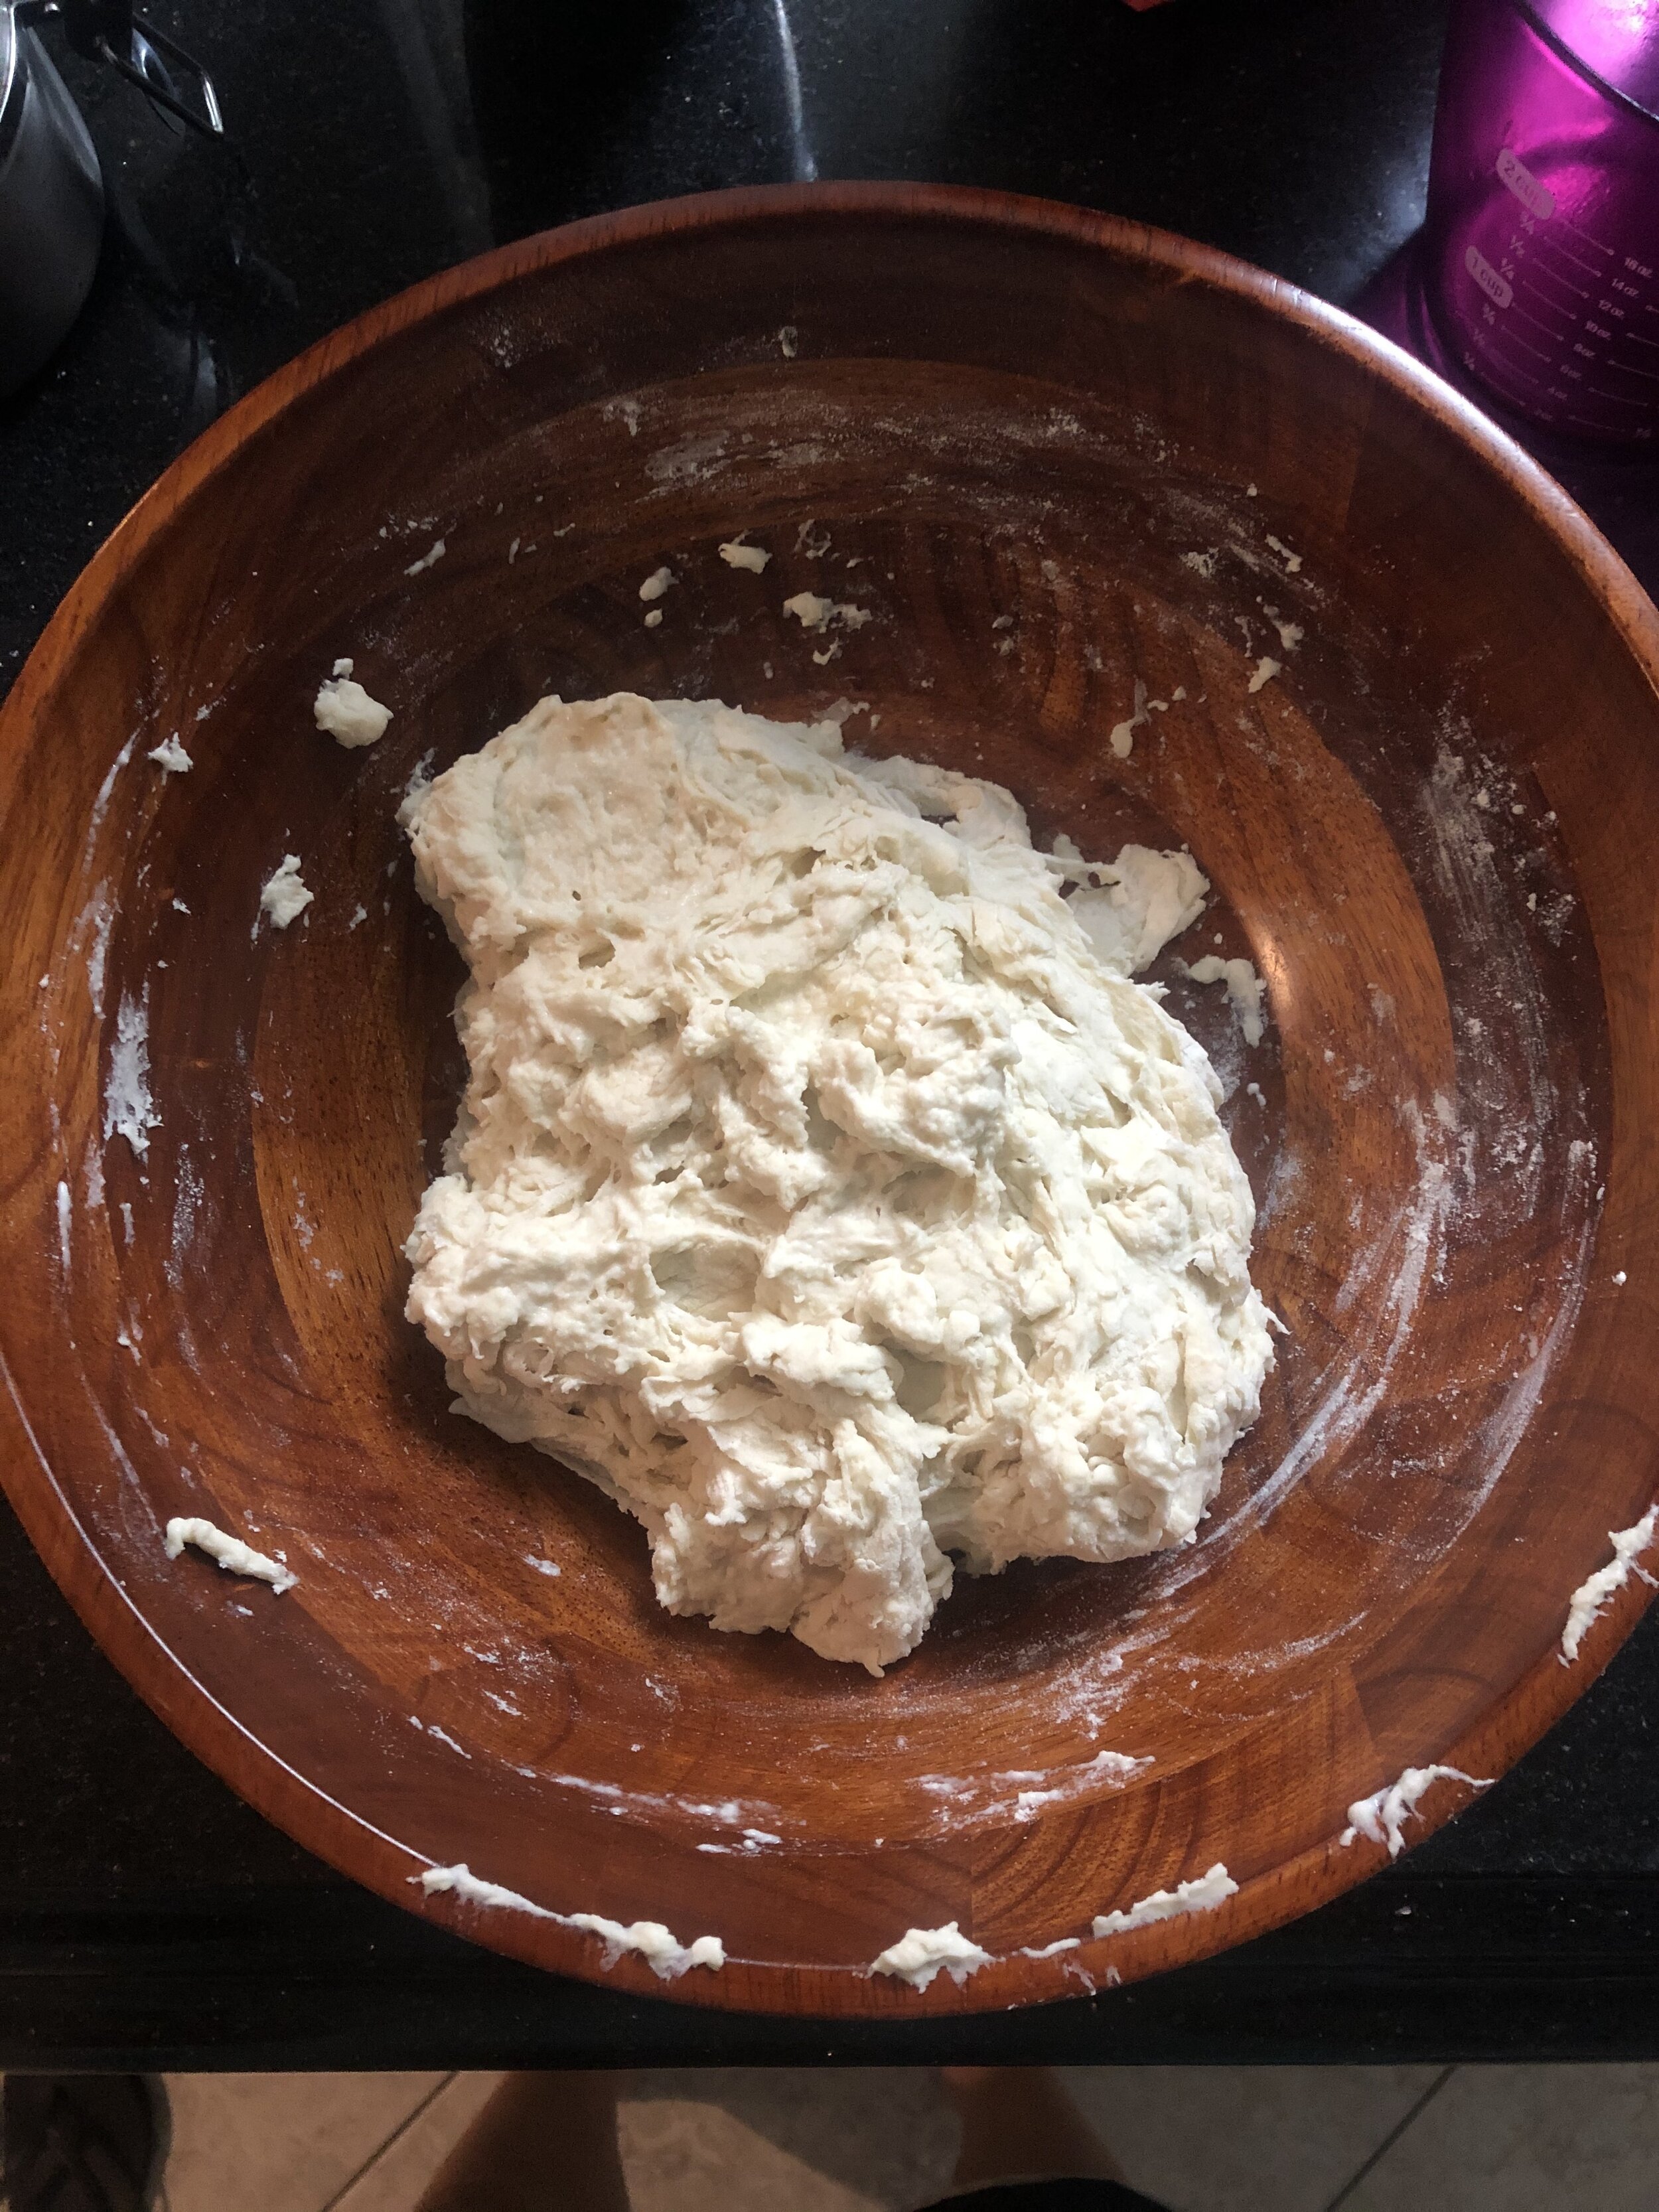
  2. Add the flour and salt and combine together with a stiff spatula until fully incorporated. If you want to use your hands, go for it, but it’s not required. The dough will look scrappy, dense and sticky.

  3. Cover the bowl with plastic wrap and let sit for 30 minutes.

  4. After the 30 minutes, flour your hands and work the dough into a smoother ball. You can achieve this by folding the dough towards the center until it smooths out.

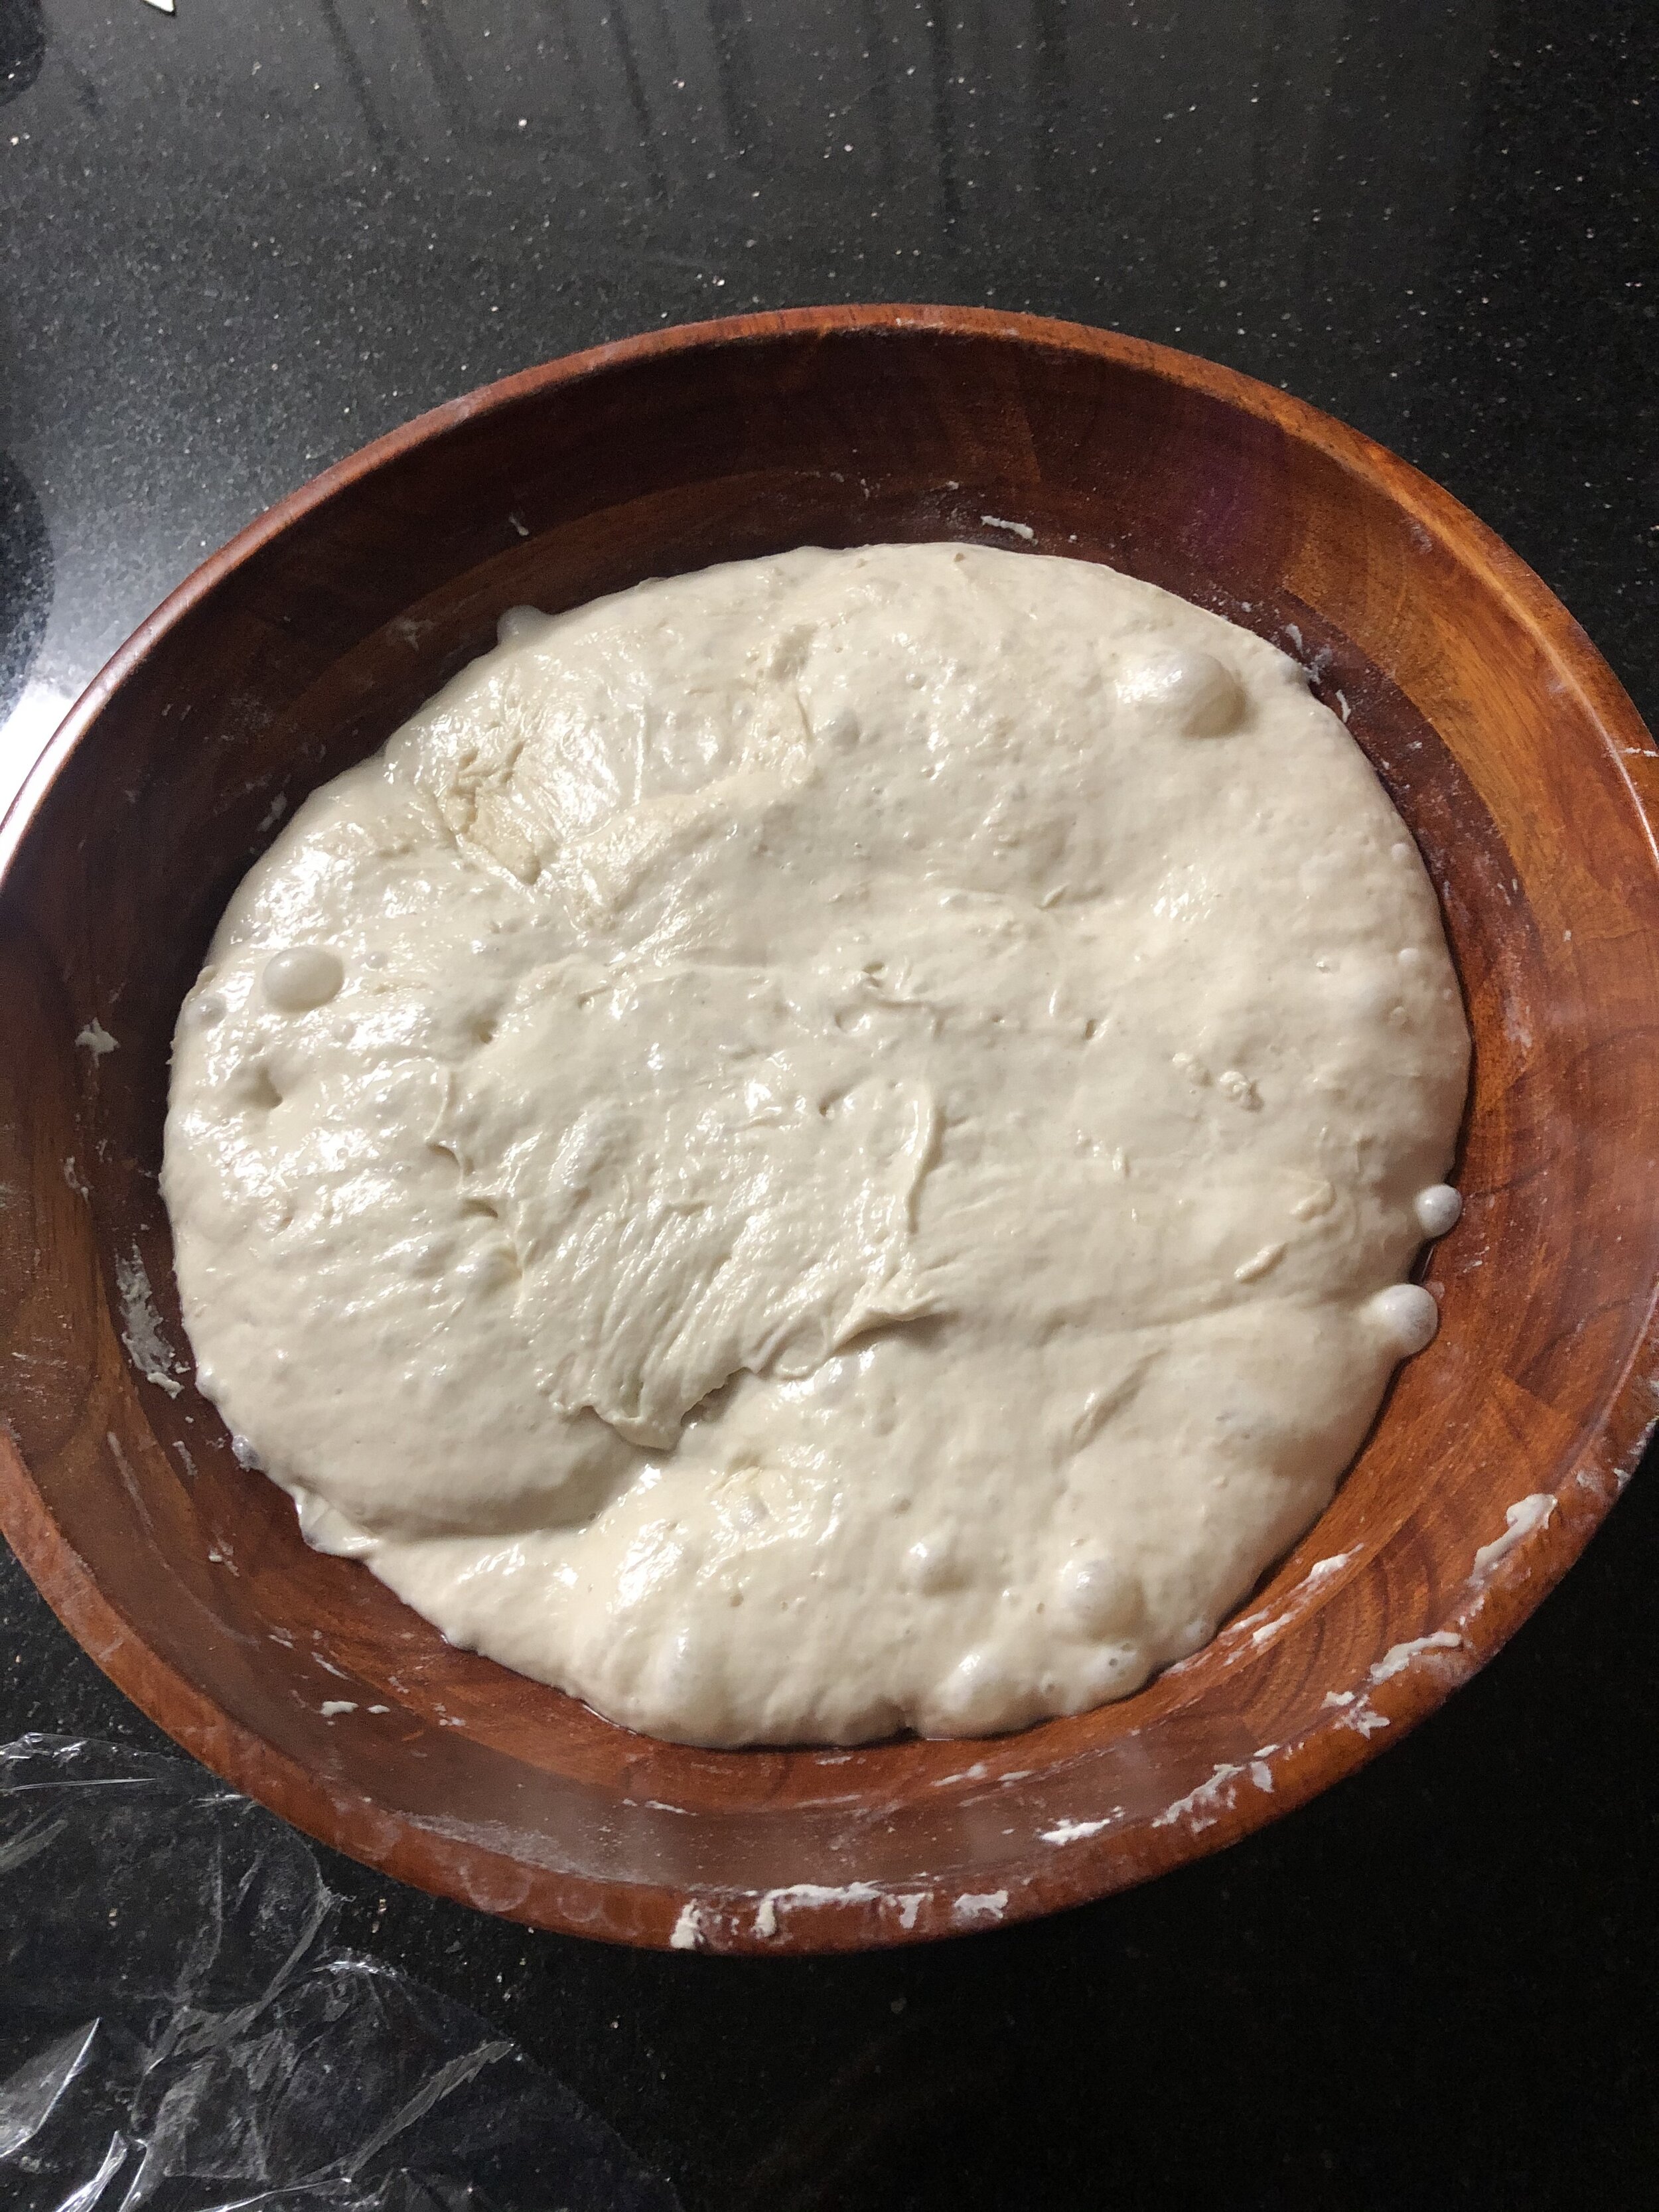
  5. Place the dough back in the bowl and let rise 10 hours. You can also do this overnight. It should rise and look a lot puffier.

  6. Use the spatula to gently pull the dough off the sides of the bowl and turn out onto a floured surface. Flour your hands and begin folding the dough over again on each side.

  7. Let rest for 10 minutes

  8. Line a large bowl with a linen towel. (don’t use a towel that produces lint lol)

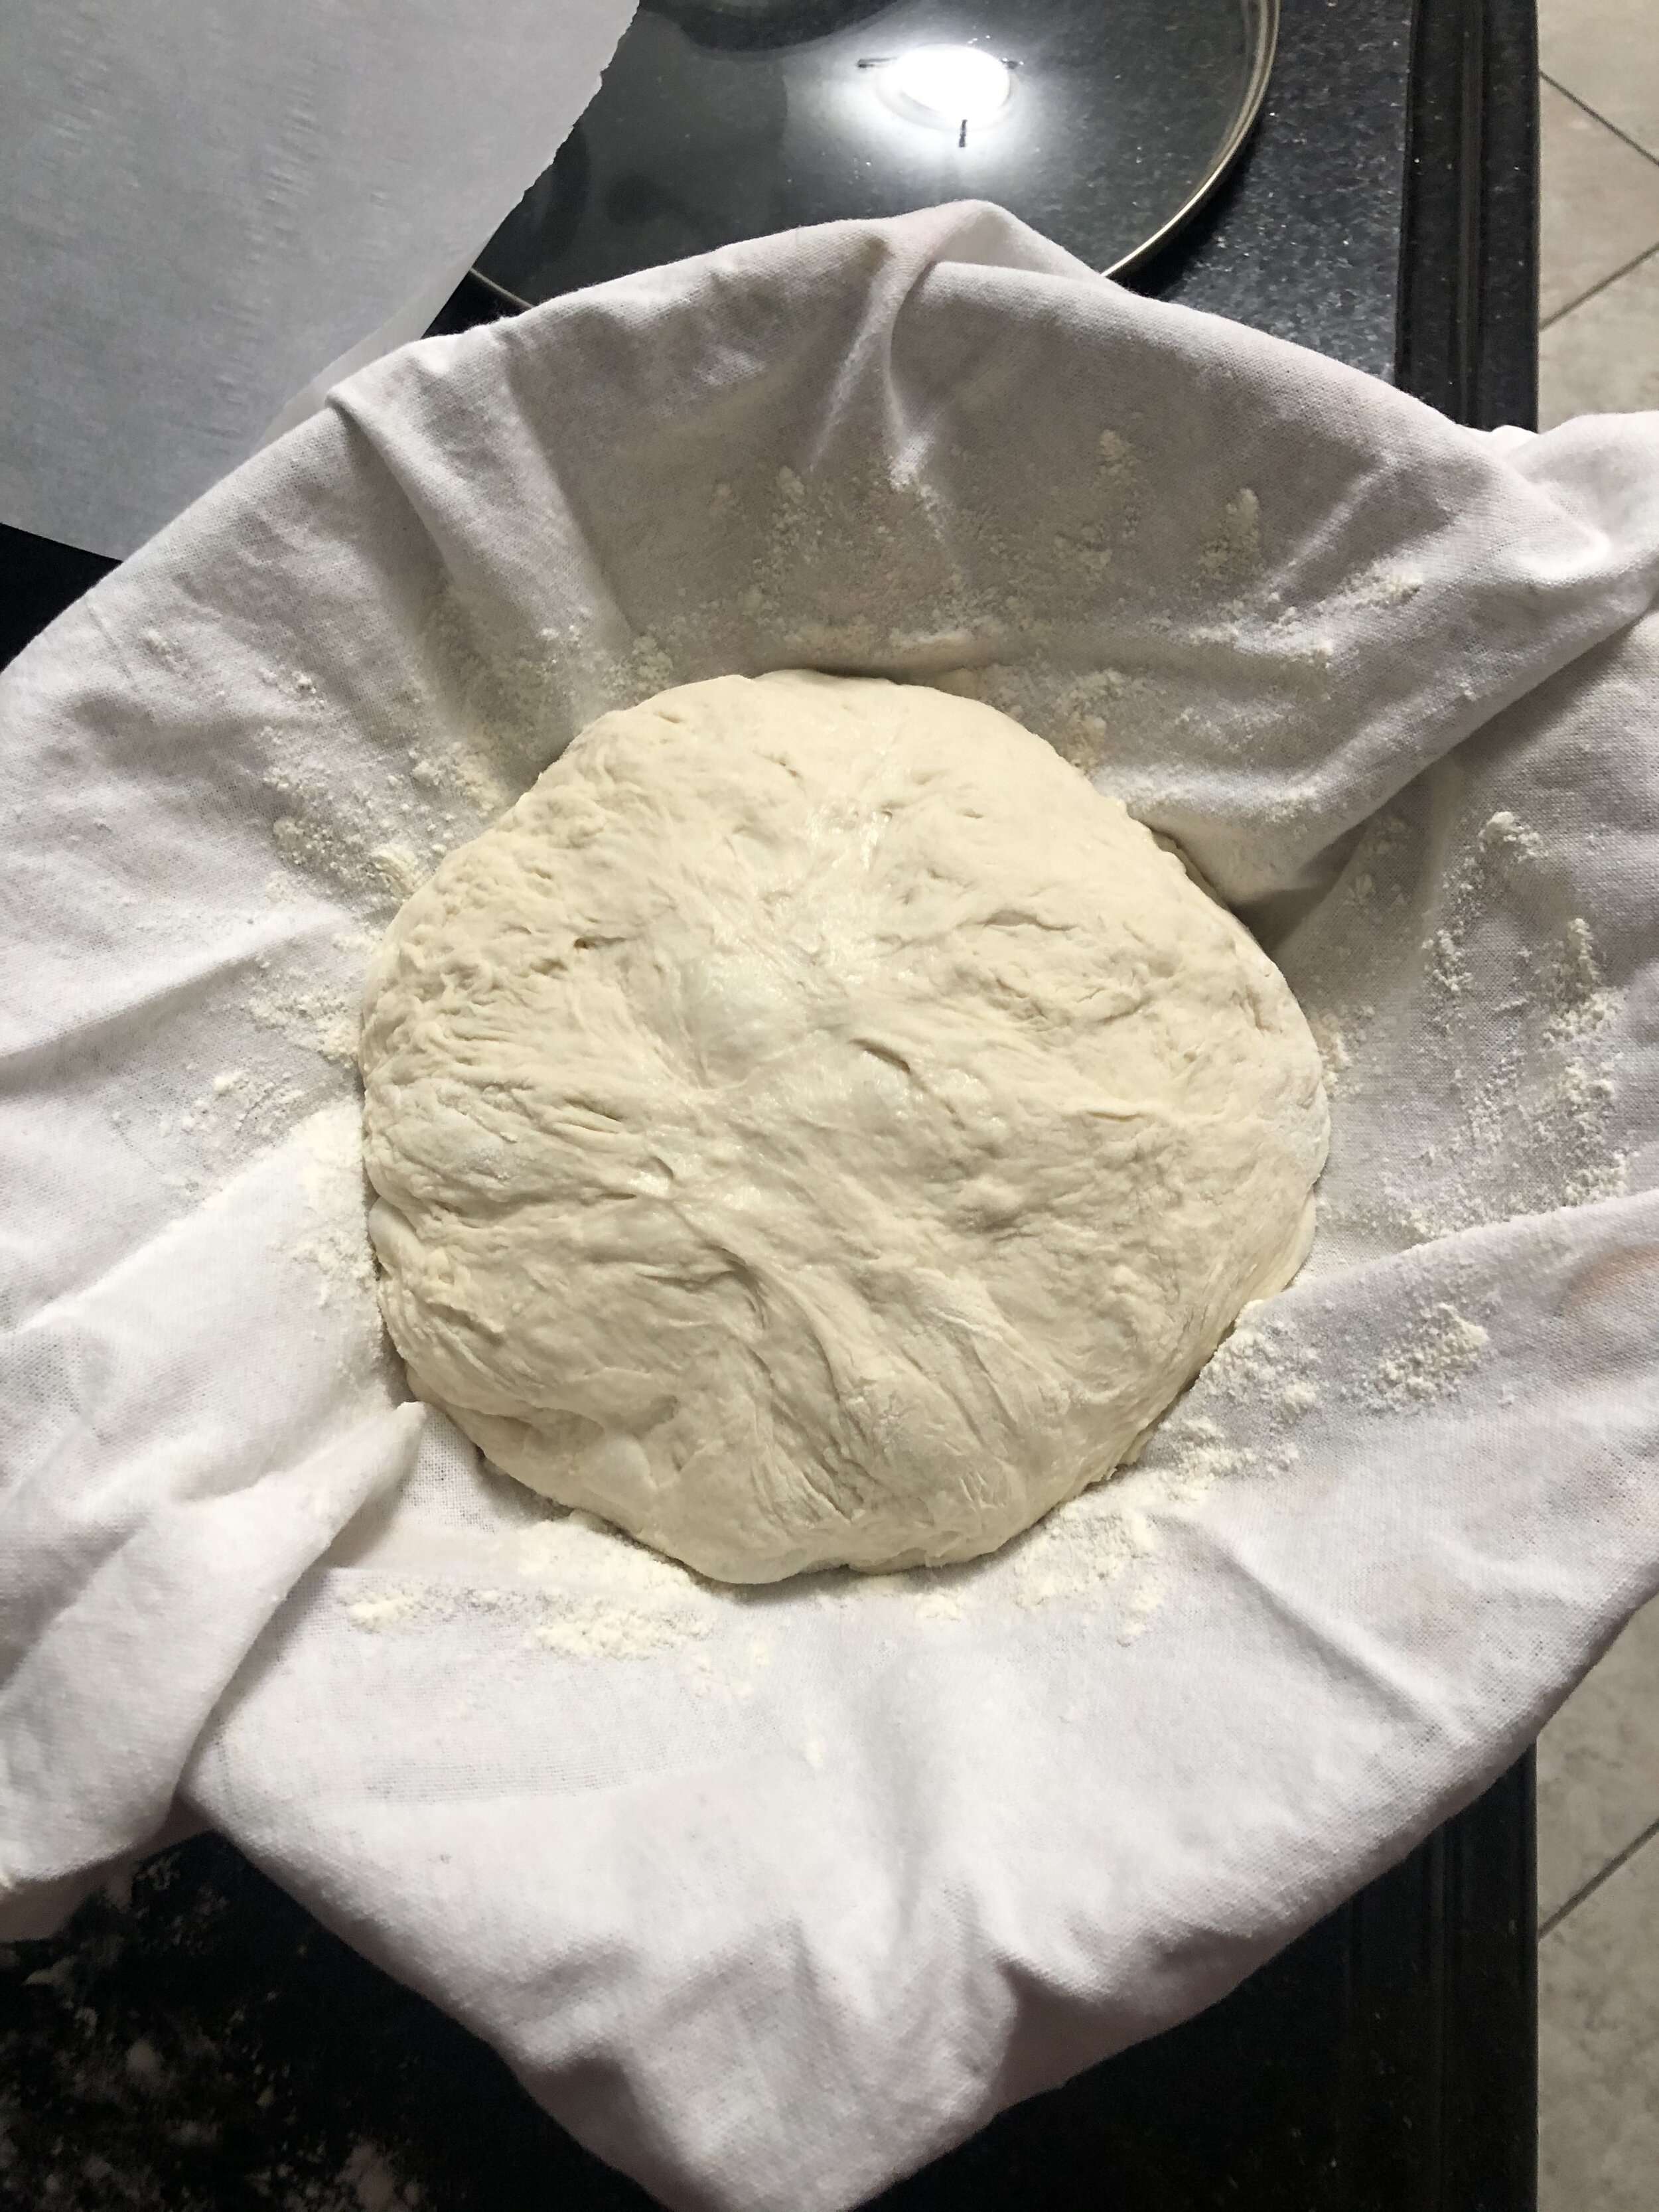
  9. Dust the bowl & towel with flour. Place the dough with the seam side up.

  10. Cover it and let it rest for 1 hour.

  11. Preheat oven to 450 degrees. Cut a piece of parchment paper to fit your Dutch Oven. Make sure there’s excess so that you can use it like “handles” to take the bread out of the pot.

  12. Place the parchment paper over the bowl and turn the bowl over to allow the dough to fall right onto the paper.

  13. Use a knife and make 4 little cuts. Or if you want to do a fun design, go for it.

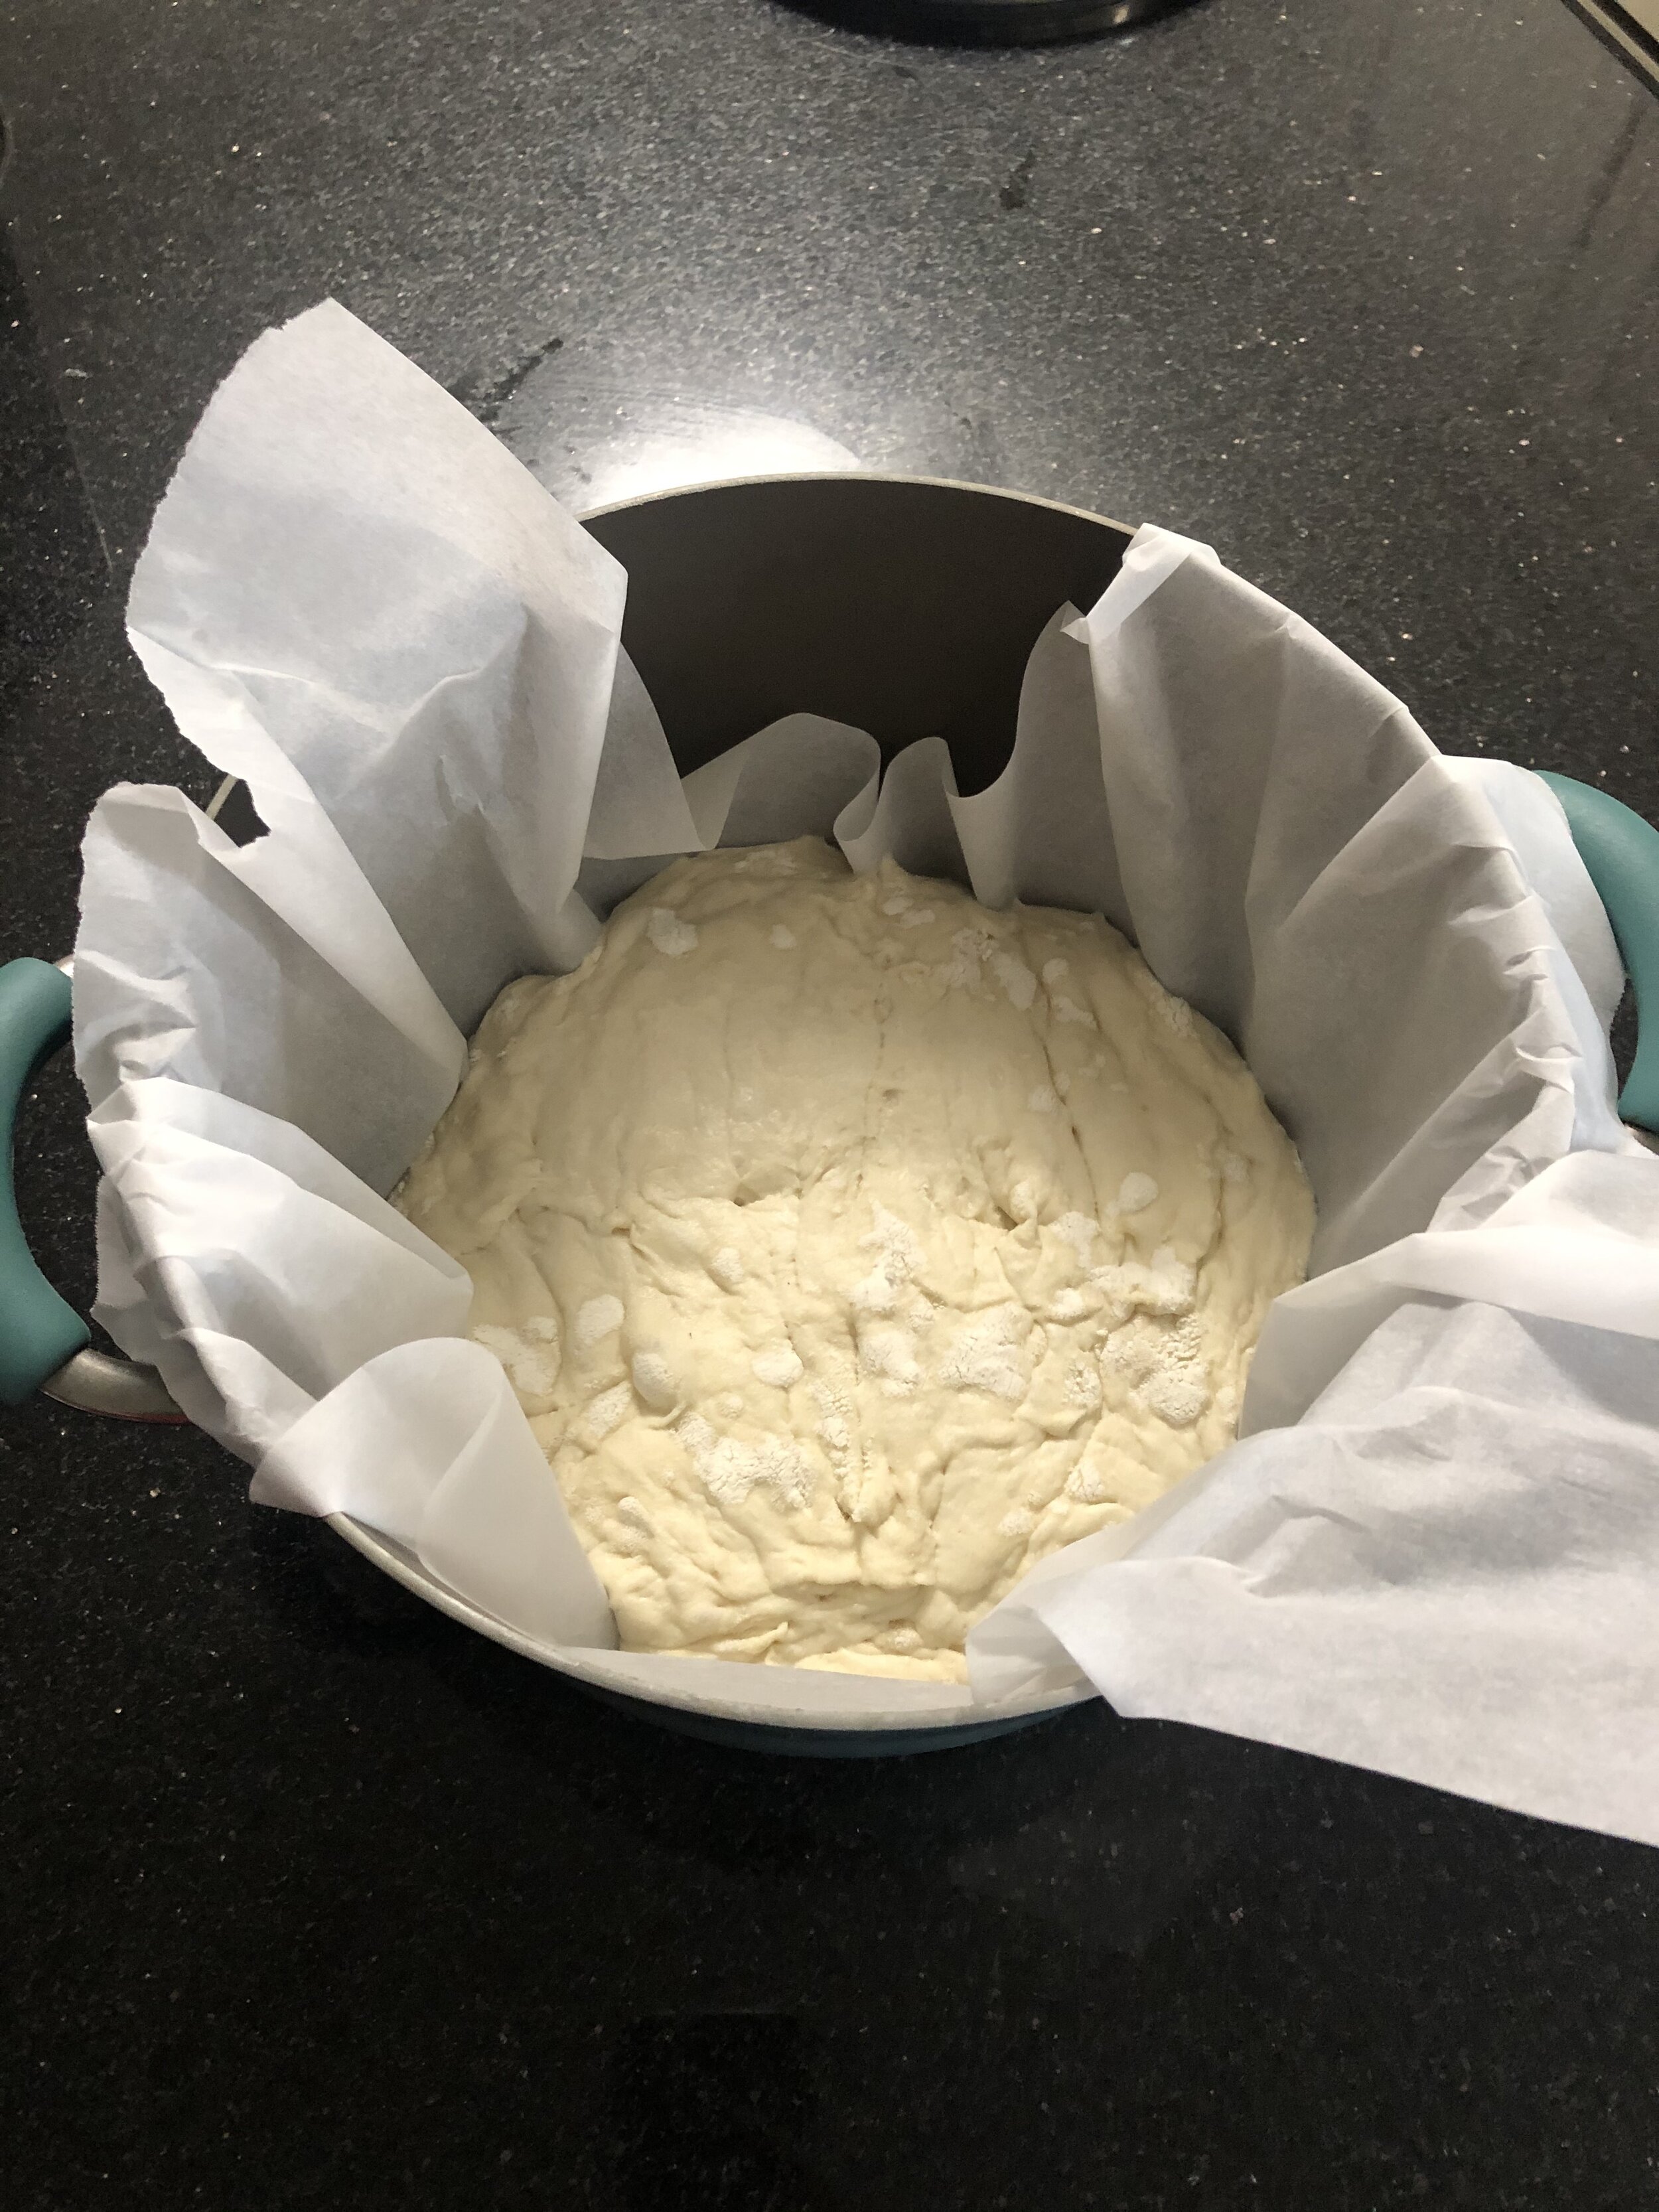
  14. Pick up the dough and parchment and place in the pot, carefully.

  15. Place the lid on the pot and put in the oven for 20 minutes.

  16. Remove the lid and bake for another 20-30 minutes. My oven temp is slightly off so I cook for a shorter time. The longer you go, the darker the crust.

  17. When done, remove the bread from the pot and cool on a cooling rack for a minimum of 20 minutes, which is so hard to do! The loaf will feel very hard and if you thump it, it will sound hollow. Don’t worry, after cooling down, it will soften right up.

  18. Slice and enjoy with a little butter!

click on the right side of the images to scroll through the steps to see if you are on track!

I hope you guys enjoy the bread when you make it! If you try other versions, let me know! I also made a Rosemary Olive Oil loaf and will post updates for that recipe soon!

Love,

Aubrey


Juicing, Sugar & Fiber

Juice is just Sugar & No Fiber

That’s what we hear a lot, and honestly, what has been perpetuated throughout the health and fitness world. So, I wanted to address what about that is true and not true, and how to navigate introducing juicing into your daily life.

Truths:

  1. Yes, juice can have a lot of sugar in it

  2. Fruit is the main culprit of it

  3. Grocery store juices are not the same as raw juice. You can see more info on that here.

  4. Juice doesn’t have AS MUCH fiber as eating the actual fruit or vegetable

  5. Juice allows your body to easily absorb the vitamins and minerals that you might not be able to from eating the produce whole.

Myths:

  1. Juicing is the same as drinking a soda. (This is so ridiculous it hurts my brain)

  2. You will get sugar highs and crashes.

  3. You should cut out fruit to avoid weight gain

  4. Juice has ZERO fiber

Let’s Talk For Real

We are first going to address the sugar in juice topic. Obviously, if you drink an all fruit juice, it will be loaded with sugar. While we offer 2 juices with only fruit, this is more for those who are interested in juicing but are scared of the vegetable ones, or it’s for when parents are trying to switch their kids from those terrible grocery store juices, to real juice.

There is a major difference in adding processed sugar to fruit juice that already has natural sugar, than a raw juice that is made up of fruits. Plus, they have been pasteurized, removing pretty much all nutrients, or is made up of maybe 10% actual juice. Raw juice, is just that.

What we always suggest is more vegetables in your juice. This will cut the sugar way down. All of our vegetable juices have a small amount of fruit, like apple or pineapple, just for flavoring but we can do only greens. It’s just making sure it actually tastes good.

Now, let’s talk about fiber. There are 2 types of fiber, soluble and insoluble. Insoluble fiber is what most people think of when they hear fiber; roughage. It is incredibly good for you, makes sure you have regular bowel movements, adds bulk during digestion and speeds up the passage of food through the digestive tract. In regards to juice, the insoluble fiber is in the pulp that comes out of the juice. So, it’s not there.

Soluble fiber absorbs water and provides matter that acts as a prebiotic, which is like food for the good bacteria in your body. Soluble fiber also helps regulate blood sugar (important) and helps fill you up by slowing down the transport of food in the digestive tract. THIS IS WHAT IS IN JUICE!

We often talk about juice as a healing method, and so you want the easiest to digest and absorb methods as possible, at first. Juice is your go-to. Allowing the body to still have fiber but be able to actually absorb and use those nutrients, is crucial.

Just to touch on the “cut out fruit” issue really quickly. That is ridiculous. Fruit has so many incredible benefits, and to say you should cut it out to avoid the carbs is the wrong thinking. If you are trying to minimize sugar intake, cut out all of the breads, grains, pastas, and added sugars before you start looking at fruit as the culprit. However, I do want to mention that obviously, eating fruit all day everyday can cause problems because of the sugars, but 99.9% of people aren’t doing that.

Wrap It Up

Okay, so to wrap it up:

  1. Juice doesn’t have to be sugar-filled. Juicing more vegetables than fruits will aid in that.

  2. Juice contains soluble fiber, which is just as important as insoluble.

  3. Cutting out fruit should be the last thing you do.

  4. Juice provides so many easily digestible and readily available vitamins and minerals, it’s foolish not to drink it.

I hope that helps some of you who might have heard some of these rumors or myths about juicing and it has put you off. Juicing is a wonderful method for your body and personally, I can attest to all of the benefits of it.

Until next time,

Keep it Fresh. Keep it Simple. Keep it Real.

Aubrey

Raw Juice - What's the Big Deal?

50129050_786052188407785_8026230717199417344_o.jpg

Can’t I just buy it at the grocery store?

Oh man, do I hear this often. I also get “the one at Starbucks is cheaper”, that one really makes me giggle. Let’s go ahead and lay out some really basic facts before I get into why you should be drinking Raw Juice.

Facts:

  1. Yes, raw juice costs more

  2. Yes, grocery store “healthy juice” costs less. (this also applies to Starbucks juice)

  3. Yes, raw juice has a very short “shelf-life”

  4. Yes, it’s still looks like the same green juice

  5. Yes, the juice at the store is different

Okay, now that we have those out of the way, we can get to breaking it down.

There is Raw juice and so, what else is there? In the industry, it’s called HPP juice, but to all of you, you don’t see the difference or even know it out-right. These are the juices that you see in the stores and juices from, typically, larger businesses.

Local juice bars, where the juice is made in store, do not HPP, so you are usually safe there. However, you can always ask if they HPP just to be safe.

Raw Vs. HPP Juice - What’s the Difference?

Raw juice is exactly how it sounds. It is where you take the produce, juice it, bottle it and then it has a shelf life of 3-6 days. It’s also the type of juice that Real Peel is and ALWAYS will be.

These juices are not made in a big warehouse, sold at the big stores or ones that are mass produced. They are usually made at your local juice bar. It is the type of juice you make at home when you buy produce and juice it. Or by your local juice girl (hi, that’s me)

HPP - High Pressure Processing

When we say “processed” here, it is not as bad as the typical processed foods you think of. When you HPP a juice, a machine is applying a certain amount of pressure, at a certain time length and more science-y stuff, but that’s the gist. It can be pressurized to make the juice last anywhere from 21 days to 90 days on the shelf.

HPP is not making juice, as it all starts out as raw juice. This is taking it one step further and processing it. What does this do? Kills quite a bit of the enzymes, bacteria and nutrients in the juice.

Well, bacteria and enzymes sound scary, so it’s okay those are killed off, right? Not totally. Those organisms and enzymes in the raw juice will be used by your body to aid in digestive processes, treated like a pre- or probiotic and boosts your immune system.

The nutrient profile also diminishes. So, again, using juicing as a healing method, you would want the most nutrient dense juice out there.

So, Raw or Grocery Store Juice?

The way I, and Real Peel, approach this topic is like this:

  1. Always choose raw juice first

  2. Raw juice heals the body and provides it all of the wonderful nutrients, enzymes and bacteria!

  3. The idea of juicing kale and then letting it sit on a shelf for 90 days makes me shudder, even though I know the bacteria have been killed off.

  4. If you do not have a local juice bar, or your local juice girl to make you juice, then yes, a green juice from the grocery store will suffice.

  5. No matter which way you turn it, raw juice will always be the more nutrient dense and health beneficial juice out there.

If you are having to choose between a Gatorade, soda, juice on the shelf or picking one of those grocery store green juices, then always choose the grocery store green juice. (or that Starbucks juice)

However, if you have the option between freshly made, raw juice or saving a buck or two on a grocery store juice, then ALWAYS, ALWAYS choose the raw juice. Your body will thank you for it later.

I know that was a little technical, but I get these questions all of the time about the difference between the juices that we make at Real Peel or the juice they can go to the store and buy.

Plus, know that when you go to your local juice bar or company, buying a raw juice makes a person do a happy dance, and you can’t beat supporting local!

Until next time,

Keep it Fresh. Keep it Simple. Keep it Real.

Love, Aubrey

5 Ways to Make Eating Vegetables More Fun

“I know I should be eating them more often, but I honestly hate eating vegetables.”

That is a sentence I hear almost every single day and definitely at every Farmer’s Market when someone sees our green juice. Thankfully, I am able to convince just about every person to try a juice sample and they end up surprised they like drinking these vegetables. Unfortunately, I can’t always be there to encourage or give samples, etc. I know it can also be a struggle to get your kids to eat them, but if they see you eating them and enjoying them, they might just be willing to follow your lead.

So, let’s talk about a few really easy ways to get more vegetables in your daily diet:

  1. Make it a family challenge. Because who doesn’t love a challenge? Create a chart with each family member's name and earn a point for each vegetable you eat in a day. Offer bonus points for including a variety of vegetables that encompasses each color of the rainbow! Decide what the ultimate prize will be and make it good! For example, maybe the winner won’t have to do chores for a week? That might be quite the incentive.

  2. Incorporate into a juice or smoothie. I include TONS of vegetables in the Real Peel juices, but smoothies are also a really easy way of getting your greens in without having to cook and eat them separately. Most people or kids won’t even bat an eye when they drink a smoothie, especially if it’s a pretty color like purple or green! The rule of thumb for a healthy smoothie that isn’t packed full of sugar is three greens/veggies to one fruit. For example, you can choose spinach, kale, cucumber, and an apple or beet greens, beets, celery, and an orange. There are millions of combos you can come up with.

  3. Grow your own. This is probably the most cost-effective and healthiest way of incorporating more vegetables in your life. You can start small with an herb garden and eventually grow in succession planting throughout the summer and fall. If gardening is new to you, pick out two or three of your favorite vegetables and grow them in a pot or container. If you already love gardening, maybe expand your variety of crops and incorporate new vegetables you normally wouldn’t grow or buy. This could be an incredibly rich experience for children to learn where their food comes from and will be much more delicious and nutritious than any store-bought veggie. For an awesome gardening resource check out The Farmers Almanac (www.almanac.com/gardening)!

  4. Join a CSA or go to a farm. If starting a garden isn’t the right choice for you, then benefit from someone else's green thumb! Finding a local organic farm will give you the opportunity to purchase a crop share or simply shop in their market. Through community supported agriculture (CSA) each week you will have the privilege of eating vibrant, just-harvested produce while simultaneously giving back to your local farmer. If you decide to shop in their market, bringing your entire family could be exceptionally fun if they offer pick-your-own produce! Getting yourself or kids involved will make your experience around vegetables more positive.

  5. Bake a sweet treat. Yes, you can incorporate your vegetables into your baking! Vegetables like squash, pumpkin, sweet potato, zucchini, and beets are the perfect addition to many baked goods. The goal is to find a recipe that includes other whole-food ingredients. Growing up, my mom made us Zucchini Bread and I never bat an eye at the fact there was zucchini in it. I would share that recipe, but it’s a family one, so I will share another one that’s alllllmost as good ;) Check out this zucchini bread recipe from Ambitious Kitchen!

Pick one and give it a go and start reaping the benefits of getting those “hidden” veggies in! Once you get one down, start another!

Until next time,

Keep it Fresh. Keep it Simple. Keep it Real.

xo Aubrey

How to Treat Gastroparesis

How Do You Treat Gastroparesis?

Now that we have gone over what Gastroparesis actually is, we have to talk about how to treat it.

There isn’t a lot out there on great methods for treating GP, but what there is a lot of out there is fear. Terms like “incurable”, “chronic”, “life-altering”, etc. While, technically, GP has been deemed a chronic and incurable condition, I can tell you that can’t be further from the truth.

Gastroparesis CAN be cured, and at the very least, it can be easily managed WITHOUT medication. That in itself is a win in my opinion.

So, what does the treatment plan look like?

The typical treatment path that is recommended is this:

  1. Try a flurry of terribly written diets

  2. Try an even bigger flurry of medications that don’t actually work

  3. Suggest surgery like a pacemaker in your stomach, or a feeding tube

I have also talked with many GP sufferers that have mentioned their doctors put them on anti-psychotics, which basically is their way of saying we don’t believe anything is wrong with you, so you must be crazy.

I’m not a doctor, so I will say that making sure you keep a doctor in the loop about your condition is important. However, I have now gotten myself to the point that I don’t need a doctor anymore, because it’s not as severe. And to get myself to this point, I took a totally different path.

Treating Gastroparesis…. the right way

What if I told you that you could eat whatever you wanted when you wanted and on your terms of when your body will act up? Right now, you might say I am crazy, but I can promise you that it can be done.

The following are a few ways I have helped myself, and many clients:

  1. Juicing. Especially in the beginning of your treatment, because your body is so devoid of the nutrients it’s needing. Juicing will help replenish those and then you can start working on the rest.

  2. Acupuncture. Think of your stomach as a battery of your car. It needs the energy to run. So, when you do acupuncture, the needles are like the jumper cables being attached to the conductors. Put a little heat over the needles and it’s sending that “voltage” to your stomach muscles through your nerves. It’s life-changing

  3. Walking. Wait, what? Yes, a simple morning 15 minute walk does WONDERS for your body. Boosts metabolism, wakes up the system, and if you do it before eating anything, you burn more fat!

  4. Nerve Toning. In my Thrive with Gastroparesis nutrition program, I teach you 3 different techniques you can do to tone the nerve. Toning your nerve back to optimal function is what makes the difference.

  5. Warm Lemon Water. I am sure by now all of my followers are like “geeze, lady, we get it. Drink warm lemon water.” That is how much I swear by it. First thing in the morning, drink a coffee cup size of warm water with a squeeze of lemon, however much you can handle. This gets your digestive system moving and creating the necessary acid.

More importantly, you have to be willing to do all of these things for longer than just a week. It didn’t take a week for you to get sick, so it won’t take a week for you to get better.

By week 3 of the Thrive with Gastroparesis program, my clients were starting to notice a real difference in their bodies and that is the coolest thing.

So, where do you go from here? Good news is that I have a completely FREE 3-day Gastroparesis Healing Guide. Just click here to get that straight to your email.

Finally, we are completely updating and revamping the Thrive with Gastroparesis 3 month Program. We are hoping for a Fall release, so if you would like to be on the waitlist, please send an email to info@realpeeljuice.com.

Until then, get started juicing, drinking your warm lemon water and going for walks. I guarantee you will start noticing a difference.

Keep it Fresh. Keep it Simple. Keep it Real.

Aubrey

What is Gastroparesis?

If you have been following me for a while, you would have heard me talk about Gastroparesis many times. I might have dropped a few bits about what it’s like and how to handle it, and I have even talked about my Thrive With Gastroparesis program, but I have never done a proper explanation of it.

Some of you might not care what it is, but I remember years ago being really sick and not being able to get any answers from doctors and then I found 1 small article about Gastroparesis and knew immediately that’s what I had. It gave me some relief and hope that I would be able to get an answer. How to treat it was another story, but I am hoping that this will help those who are currently struggling and stumble upon this, find relief.

39027471_689839301362408_2403275373115604992_n.jpg

What is Gastroparesis?

By definition, Gastroparesis is a stomach condition that affects the stomach muscles and prevents proper stomach emptying, according to the Mayo Clinic. There are two types, Diabetic and Idiopathic. For the sake of this blog, we are mostly talking about Idiopathic, although, a lot applies to both.

By my definition, it sucks. But truthfully, the nerves that are connected to the stomach muscles, don’t fire properly and so the stomach muscles don’t get the message to move food along. This then allows the food to sit in the stomach and go rancid and that’s when you see a lot of the symptoms pop up.

Symptoms typically include:

  • bloating

  • nausea

  • heartburn

  • feeling full very quickly

  • vomiting

  • abdominal pain

  • unbalanced blood sugar

  • lack of appetite

  • malnutrition due to lack of nutrient absorption

  • major weight gain or loss

  • and these don’t include all of the mental and emotional side effects

What Does Gastroparesis Look Like?

Unfortunately, GP is one of those hidden conditions. To most people, I look perfectly healthy. In its beginning stages, Gastroparesis doesn’t cause you to be in the hospital or anything like that. You can function, maybe not optimally, but you can. It feels like a constant, severe stomach ache. However, no one takes that seriously, so you just have to keep going.

Left untreated, it can lead to such severe malnutrition that you end up in the hospital on a feeding tube. Sadly, there have been a few who lost their lives because of it, but it doesn’t have to be that way. We shouldn’t have to let it get this far.

How Do You Diagnose Gastroparesis?

Usually before you get diagnosed with GP, you will have run the mill of different digestive tests. It looks something like this

  1. Weird and not fitting to GP, elimination diet. This diet they give you would be helpful if you didn’t have GP, so yes, it does eliminate other possible conditions, but unfortunately, could make your GP symptoms worse.

  2. Some type of reflux or IBS medication

  3. Endoscopy and colonoscopy. They will usually do a biopsy to rule out many different conditions and cancer

  4. Stool test. That one is always fun.

  5. Nothing else has worked, so maybe some other random medication.

  6. A good doctor continues to dig and eventually suggests the Gastric Emptying Test. This is the only way to diagnose GP.

The test involves you going in and they give you a meal that typically consists of eggs, toast, orange juice, and water. In the food is a minuscule amount of radioactive material that they can watch on a scan leave your stomach.

You just lay there and they watch for certain time intervals to indicate what percentage has left your stomach. There is a standard for how much you should have emptied at each time frame, being 1 hour, 2 hours and then 4 hours.

In mine and most people’s cases, if you haven’t emptied more than 40% after the second hour, they let you leave, because you didn’t pass the benchmark and it will be considered delayed. Sometimes, they will make you stay the full 4 hours, though.

You have the Diagnosis, now what?

So, now you have the diagnosis, how do you go about treating it?

Well, I have a lot of thoughts on how it is technically treated and how it should be treated, so we will save that for another blog.

In the meantime, you can grab our completely free 3-Day Healing Guide here.

I hope this is helpful for those of you who are in the searching for answers phase. One thing I want to make sure you remember, is to advocate for yourself. You know your own body better than anyone else, and it is okay to ask the doctor for different tests, even if they stop believing you. And if they won’t do it, find another one who will, until you get your answers.

Until next time,

Keep it Fresh. Keep it Simple. Keep it Real.

Love, Aubrey

Why is Digestive Health So Important?

What is Digestive Health, exactly?

Most people only think of their digestive system as being their stomach to their bowels, but it involves so much more. Making sure each part of the system is working properly is important in order to feel your best. So, how do we make sure our whole digestive system is healthy? And why should we care?

What Does the Digestive System include?

One of my favorite ways to illustrate the parts of the digestive system is this graphic from the Nutritional Therapy Association. I think it explains it perfectly.

Picture1.jpg

As you can see, it starts in your brain and ends, well, at the end. There are many other “side factors” that have an impact on the flow of digestion. For example, the liver and gall bladder. The food doesn’t directly pass through these organs, but they do play a large part in breakdown and flow of the food as it travels through the system.

Why is it important?

The digestive system not only affects how your stomach feels during and after meals, but it has affects on other systems of the body.

For example,

  • Immune system: this can get quite complicated, but poor digestion can cause you to be sick more often, it can also affect how your body’s immune system responds to different things.

  • Nutrient Absorption: this is something I have dealt with personally with Gastroparesis, but when you don’t digest correctly, your body can struggle with absorbing the nutrients. Deficiencies in different nutrients can cause a domino effect of issues. (hair loss, PMS issues, skin issues, dental issues and more)

  • Fatty Acid Deficiencies: fats take a while to break down in your digestive system, so having it working from the get go is super important. If your body can breakdown and use the fats appropriately, you will start seeing issues with hormone production and use, it can affect how well your muscles can perform and even brain function.

  • Sugar Handling: something those of us with Gastroparesis deal with is sugar cravings. That is usually because of our poor digestion. We aren’t getting to use the energy source fully from the food, so we crave that energy spike. So, we turn to sugar. However, this is similar to those without GP. The mishandling of sugar can lead to diabetes and that is not something you want to do.

There are more side effects from poor digestion, but I think this covers the main things. Also, I don’t want this blog to be forever long. But I also think this illustrates how important it is to get your system functioning properly.

How Do You Keep it Healthy?

There are a myriad of things you can do and I am sure there are plenty of “quick fix” products people will try to sell you to get to it, but most of it can be achieved through simple, natural fixes.

  1. Increase acid production (controversial, I know, but it’s true. If you would like to discuss this further, we can) Can be done with more fermented foods, lemon water, ACV and more.

  2. A good probiotic. Something I like to do is sip on Kombucha throughout the week, never drinking a full bottle at once. Too much at once can bloat you.

  3. Chewing your food at minimum 15x each bite. Similarly, putting your fork or spoon down in between bites. Also, “chewing” your smoothies or soups will help let your brain know

  4. Get active!! I don’t mean doing 1 hour HIIT workouts. I just mean simple walks. This awakens your system to start moving food through.

  5. Don’t lay down after eating a meal.

  6. Stay hydrated with water. Sip on it, don’t chug it, between meals.

Simple fixes you could literally start doing tomorrow!

Start implementing some of these things, give it a few days and you will start noticing some differences. Then, if you want more help, that’s what I am here for!

Until then,

Keep it Fresh. Keep it Simple. Keep it Real.

Aubrey

I Juiced for a Month Straight - The Results

fresh-pressed-juices-1920x1080-1024x576.jpg

It’s Not What You Think

If you have been following me for a while, you are probably thinking, “wait a second, you always say don’t do a cleanse for more than 3 days in a row”, and you would be right.

I did not do a cleanse for a month, because 1. that would be just stupid 2. that sounds like torture 3. your body would be in worse shape. However, I did drink a juice pretty much everyday for the month of February. If I am being totally honest, I did have to miss a small handful of days, because of traveling.

Why Did I Do This?

I have Gastroparesis, and I have talked about it many times, but what I don’t talk about often is how it affects me daily and my diet. It often causes me to be very full after just a bite or two of food, it causes me to have intense sugar cravings, because of the lack of fuel for my body, and it can make me cramp up and feel all around icky.

So, I had been noticing that I was struggling during the month of January, even though I was eating very healthy, and I did some reflecting on when I was feeling my best. This brought me back to when I was juicing daily.

I would wake up every morning and make a juice for breakfast. This allowed me to get a lot of nutrients in my body, fuel me until lunchtime, but without the pain of digesting whole food, the cramping, the bloating and the all around sick feeling. (disclaimer: I will always choose eating food over drinking it, but for one meal, it makes a huge difference)

February rolled around, and I did exactly that. If you have been following me on Instagram, then you would have seen some of the juices in my stories.

edited.jpg

The Results:

  1. Bye bye sugar cravings. Thank the freaking lord, because it was getting bad, and I was getting really fed up with it. Drinking a juice each morning allowed my body to absorb and assimilate the nutrients in my body and be put to use, instead of being stuck in my stomach for hours on end.

  2. Energy for dayyyyyyyys. No, it’s not a sugar rush and then crash. Because my body was getting to use these nutrients, it was fueling my body to perform optimally. One of the days I didn’t get to drink my juice, because my husband drank it, he texted me and was like what the heck is in this juice? He said his energy was insane, and longer lasting than coffee, and no crash. WIN!

  3. Motivation. Sounds weird, but when you put something so good into your body, and start feeling good, it motivates you to continue on for the rest of the day. Best part was as soon as I started feeling hungry, I ate food. I didn’t deprive myself. I was, however, more conscious about making really good choices for lunch and dinner.

  4. Weight loss. I debated on even talking about this, because it wasn’t my focus and I don’t ever want to give the idea that juicing is a weight loss solution, because it is a piece of the solution, not the whole. More than the few pounds that I lost, it’s the way my clothes fit. I feel good in them, not like ehhhhh I need to lose weight. Y’all know what I’m talking about.

  5. Happier. This has other factors that contribute to it, like new business opportunities, learning new things about nutrition and health, family, etc. BUT I do know that when my body feels good, I feel happier, more confident and all around good, which then gets relayed to others and makes them happy.

Should You Do This?

Okay, now you have seen my results, you are wondering if you can get a piece of those feelings, so where should you start?

You need to evaluate what your goals are for it. If they are singularly weight loss, then don’t waste your time. If they are weight loss, but also curb cravings, increase energy levels, teach yourself discipline, etc. then let’s talk.

You drink 1 juice daily for breakfast, then eat regularly for lunch and dinner and any snacks, but ideally you make good choices. If you miss one morning, that’s okay, don’t wait for the next Monday, just start over the next morning. Ideally, picking more green juices is the best route, however, if you are new to juicing start easy with more fruit based ones to get your body used to it.

Overall, I am so happy I did this again. It just reinforced the fact that I shouldn’t deviate away from what makes me feel good. So, I am continuing on into March and so excited to see how I feel after another month.

If you would like to get started, or would like some help picking out juices to start with, please feel free to comment or reach out to me by email at info@realpeeljuice.com.

Until next time.

Keep it Fresh. Keep it Simple. Keep it Real.

Aubrey xoxo